Unit 25 Studio Photography
Statement of Intent:
In this Unit I will be researching, exploring and producing work on fashion and product photography. For fashion photography I will research general fashion artists to get a general idea of what my options are, then explore one idea further. I have already decided that I would like my final outcome to be a "look book", therefore I will research artists such as Jeff Delacruz and John Hong for this idea. A look book is a collection of photographs compiled to show off a model, style or clothing line. Most popular with bloggers or vloggers, they will model fashionable looks for the current month or season. I also plan to have plenty of practice shoots in this unit to ensure than my final shoot and outcome is perfect. Ideally I would like 2 look books, one with a woman as the model and one with a baby/small child as the model. My reason for this is because fashion is everywhere, it rules over our lives yet it is mainly adult fashion that you see in magazines, on TV and on billboards. I think it would be amazing to have a look book of different outfit choices for parents to get inspiration from. As well as researching general fashion photographers and look book photographers, I will research baby/child photographers such as Anne Geddes and Lisa Holloway to get inspiration for my baby/child photoshoot.

Essay:

Fashion Photography
Fashion photography is a genre of photography devoted to displaying clothing and other fashion items. Fashion photography is most often conducted for advertisements or fashion magazines such as Vogue, Vanity Fair or Elle. Over time fashion photography has developed its own aesthetic in which the clothes and fashions are enhanced by the presence of exotic locations or accessories.
In this Unit I will be researching, exploring and producing work on fashion and product photography. For fashion photography I will research general fashion artists to get a general idea of what my options are, then explore one idea further. I have already decided that I would like my final outcome to be a "look book", therefore I will research artists such as Jeff Delacruz and John Hong for this idea. A look book is a collection of photographs compiled to show off a model, style or clothing line. Most popular with bloggers or vloggers, they will model fashionable looks for the current month or season. I also plan to have plenty of practice shoots in this unit to ensure than my final shoot and outcome is perfect. Ideally I would like 2 look books, one with a woman as the model and one with a baby/small child as the model. My reason for this is because fashion is everywhere, it rules over our lives yet it is mainly adult fashion that you see in magazines, on TV and on billboards. I think it would be amazing to have a look book of different outfit choices for parents to get inspiration from. As well as researching general fashion photographers and look book photographers, I will research baby/child photographers such as Anne Geddes and Lisa Holloway to get inspiration for my baby/child photoshoot.
Essay:
In this essay I will contrast and compare different types of studio
photography, and I will look at technical issues, health and safety issues and
ways of working with different types of studio photography.
The different types of photography I will be looking at are fashion and
working with models, product photography, and still life photography.


There are elements of all three that share the same technical aspects
for instance; the photographer will always be in charge of the whole lighting,
technically many pieces of equipment will be the same such as soft boxes,
tripods, snoots, reflectors, backdrops, remote units for firing the lights and
certain types of light and shadow objects.


Softbox

Snoot


Backdrops

Tripod

Softbox

Snoot
Reflectors
For fashion photography you are generally working with a model, so firstly
you need to think about health and safety issues and working conditions. The
studio needs to be set up and exposures worked out before the model is used.
This method allows the model to be under the lights for as little time as
possible, the model should be allowed plenty of breaks to allow them to give
their best whilst being photographed. The photographer can use either flash
strobes or constant LED lighting, the LED lighting is cool lighting and doesn’t
produce heat. Equipment often used with models are reflectors, key light and
fill light, fans, and one would often use a makeup artist, and plenty of props.

Photographers who shoot fashion are normally good with people and have
great communication skills. The photographer also needs great ideas on poses,
shapes, actions, body language, and they also have to understand the fashion
that they are photographing. They need
to work closely with the clients to achieve the desired outcome as the clients
are quite often in the studio whilst the shoot is going on. The photographer
needs to be open to suggestions and ideas in a receptive way. Clients for
fashion photography may be fashion houses, magazines, clothing brands, and
independent shops.
Product photography differs from fashion photography in that generally
you are not working with people, and therefore not on such a tight timescale.
Once again the photographer should have good ideas, but may have to shoot to a
specific idea from the client. Health and safety issues are relating to studio
elements such as heat, electricity, liquids, working in the dark, tripping
hazards etc.
The difficulty with product photography can be down to something as
simple as the size of the product, an example is taking a photograph of a
perfume bottle will be totally different to taking a photograph of a car. A
product photographer needs a varying amount of equipment and may even have to
hire extra lights and equipment or a larger studio space for large objects. Similar
to fashion photography the product photographer will need to be open to
suggestions and ideas whilst photographing the products, as the client will
have a strong idea of what they want. Quite often products have colour schemes
relating to the brand. With product photography you can quite often have the product
for anything from a few days to a week, so you have plenty of time to shoot
lots of different ideas and plenty of editing time. Equipment generally is
specific to the product, small products would need small pin lights, barn doors
and reflectors (on a reflector tripod). Large products would need multiple
lights, coloured gels, tripod, backdrops, possibly a projector, and an entry
and exit big enough for the product. Clients for product photography include
manufacturing companies, shops, businesses, individuals and anyone selling a
product.
Still life photography is often art based and may be individual to the
photographer carrying out a personal project. Traditionally still life scenes
originated from paintings, a traditional still life scene may be a bowl of
fruit or a vase of flowers. The technique is quite similar to product
photography. The photographer Robert Maplethorpe carried out many experiments
with still life photography using light, shadow and very little colour. In a
traditional painted scene the light would be quite dim as generally artists
painted by natural light, perhaps near a window. This dim lighting was copied
for many years by photographers, and is still looked upon as a traditional
still life scene: see Don Mccullin still life.
Technically you could use minimal lighting with still life and just use
one light at a low voltage, but you would have to use a slow shutter speed and
a tripod to reduce camera shake. You’d have very few clients for still life
photography, perhaps flower shops, people selling traditional or classic items
and cafes.
In this essay I have covered the three studio subjects of fashion,
advertising and still life. I have written about health and safety issues,
technical issues and equipment used. I have also covered what clients you may
have and what they may want, and also the skills you would need as each
individual photographer.
Fashion Photography
Fashion photography is a genre of photography devoted to displaying clothing and other fashion items. Fashion photography is most often conducted for advertisements or fashion magazines such as Vogue, Vanity Fair or Elle. Over time fashion photography has developed its own aesthetic in which the clothes and fashions are enhanced by the presence of exotic locations or accessories.
Fashion Photographers:
Guy Bourdin:

Guy Bourdin (1928-1991) was a French fashion photographer known for his provocative fashion images. Bourdin worked for Vogue and Harper's Bazaar, and shot ad campaigns for Chanel, Issey Miyake, Gianna Versace, Loewe and Pentax. His first retrospective exhibition was held at the Victoria & Albert Museum in London in 2003, and then toured the National Gallery of Victoria in Melbourne, Australia, and the Galerie nationale du Jeu de Paume in Paris. He is since considered as one of the best known photographers of fashion and advertising of the second half of the 20th century. He set the stage for a new kind of fashion photography.
Below is a selection of my favourite images by Guy Bourdin:


What I really love about Bourdin's work is how unique and slightly strange it is, but also how provocative it is. In a world where it's perfectly acceptable for men to be have nude but women are told to cover up I think work like Bourdin's is important. I have never quite seen work like this which is why it's so striking and interesting to me, and I have definitely taken inspiration from his work, especially the semi nude shots. The only thing I dislike about his work is the lack of variety in his models. I feel very strongly about body confidence and self worth and always try to have a variety of different models in my work whether that be weight, height, race, religion or gender/sexuality. I think photography appeals much more to the public (and especially myself) when it's a variety of models and not just a bunch of size 8 white females that look exactly the same.
Irving Penn:


Irving Penn (1917-2009) was an American photographer known for his fashion photography, portraits and still lifes. Penn's career included work at Vogue magazine, and independent advertising work for clients including Issey Miyake and Clinique. His work has been exhibited internationally and continues to inform the art of photography.


What I like about Irving Penn's work is the wide variety of models he uses in his work, he uses a wide range of ages, genders and races, and also unusually beautiful models. I definitely take inspiration from this as I think it's important to shoot all different types of people not just the "socially" beautiful models. I like his black & white style, it's so simple but effective.
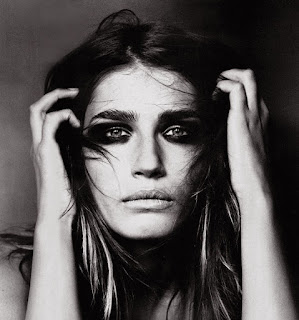
Erwin Blumenfeld- The Man Who Shot
Beautiful Women:


Beautiful Women:

Erwin Blumenfeld (1897-1969) was a photographer and artist born in Germany. He was best known for his fashion photographs published in Vogue and Harper's Bazaar in the 40's and 50's. In addition to his fashion photography he produced an extensive body of celebrity portraiture, fine art photography, black and white nude photographs, drawings and collages.

Grace Kelly for Cosmopolitan
1955

Eiffel Tower Photo for Vogue
1939

Nude Under Wet Silk
Paris 1937

Jean Patchett for Vogue US Cover Photo
1st January 1950

Victoria von Hagen for Vogue US
15th October 1952
Male Fashion Photoshoot
Male Fashion Mood Board

Set Up:


I decided to only use one light for this shoot and a black backdrop, this is because I wanted lots of shadows instead of bright images.
Contact Sheet:


Best Images:


I really like the lighting in this image specifically, his left side is lit up and his right side has some really effective shadows.

I really like the composition of this image and the contrast between the model and the backdrop.


I like the way the model is stood in this image, even though his pose is strong he still looks relaxed (his hands in his pockets makes him look relaxed).

I really like the lighting in this image specifically, his left side is lit up and his right side has some really effective shadows.

I really like the composition of this image and the contrast between the model and the backdrop.

I really like that the model is leaning to the side in this image instead of facing straight towards the camera, this makes the model look really relaxed instead of uncomfortable.
Edited Images:


Development Through Photoshop:


First of all, I selected the polygonal lasso tool (shown above left) to select just the model in my image. I made sure to be careful in not selecting too much of the background.


This is the final outcome.

I started with quite a bright and sharp image, as I wanted my tutorial to be as simple to follow as possible.


First of all, I selected the polygonal lasso tool (shown above left) to select just the model in my image. I made sure to be careful in not selecting too much of the background.


Then, I right clicked the selection and selected layer via copy. This makes just the selection into a new layer without deleting it from the background layer (shown above right).


Next, I made sure the background layer was selected then went to filter > noise > median. This filter makes the selected layers completely blurred, which then makes them appear cleaner and gets rid of creases. I adjusted the radius until I was happy with the effect.


I then selected the copy layer (the model) then went to filter > sharpen > unsharp mask, and adjusted the radius and amount until I was happy with how sharp the image was. Unsharp mask is always the sharpening tool that should be used because it really sharpens the images without making them look unrealistic and grainy.


After sharpening I went to image > adjustments > brightness/contrast, and adjusted the settings until I was happy with the image.


After brightness/contrast, I went to image > adjustments > levels.. and adjusted the levels until I was happy with the effect.


To fix the contrast between the model layer and the background, I used the blur tool (shown above left) to slightly blur the edges of the model layer. This just means that it will look more realistic and less copy and pasted. I also zoomed in and gently blurred the models skin, to give a really natural "airbrushed" look.


To finish off, I used the dodge tool (shown above left) to ever so slightly lighten the models eyes. I only lightened the left eye first to show what a difference it makes.

This is the final outcome.
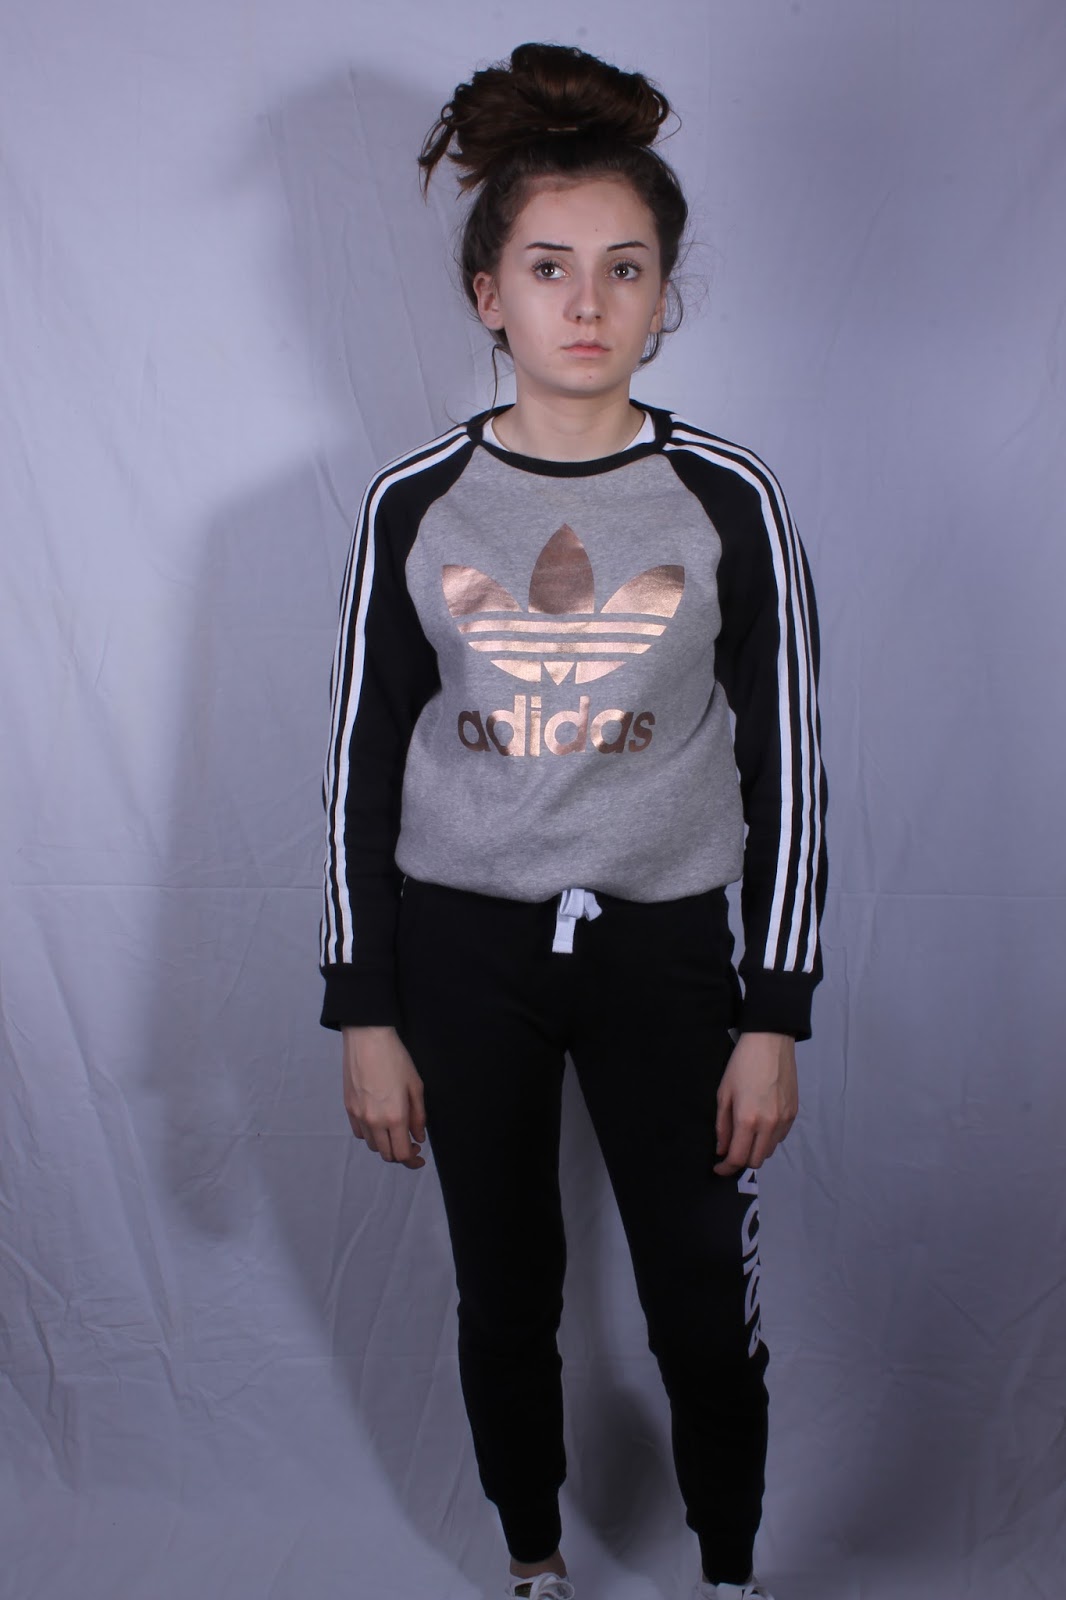
Female Fashion Photoshoot
Female Fashion Mood Board

Practice Shoot:
Female Fashion Mood Board

Practice Shoot:
Contact Sheet:


Best Images:


Failed Images:


Edited Images:


Development Through Photoshop:


This is the image I started with, as you can see the backdrop is nowhere near as white as it should be and is also creased. I'm going to fix this along with some other adjustments.

First I went to Layer > Duplicate Layer > OK to duplicate the layer.

I then went to the layer style of the duplicate layer and set it to "screen", which as you can see made it much whiter/lighter.
I then went to the healing brush tool and changed the size to 150, alt-click to define area source then clicked on the creased areas to get rid of creases.

This is after healing the creased areas.
I then used the dodge tool shown above and changed the size to 400, to lighten all of the grey areas.

This is after dodging the darker areas.
After dodging I then went to the blur tool and kept the size at 400, and brushed it over all of the white areas to blend it all out.

This is after blurring.

I then went to Filter > Sharpen > Unsharp Mask...

....and changed the settings to the screengrab shown above to sharpen my image properly.

Then, I went to Image > Adjustments > Brightness/Contrast..

...and changed the settings as shown above, as you can see this looks much more effective.

After brightness I then went to Image > Adjustments > Levels..

...and changed the levels as shown above. This lightens the white and darkens the darker areas.

I then used the brush tool using an adidas logo brush preset that I made earlier, and stamped it onto the corner of the image.

This is the final outcome.
Lookbook Photographers
Jeff Delacruz:

Jeff Delacruz is a Chicago based fashion lifestyle photographer, specializing in fashion photography for lookbooks and advertising campaigns for clothing designers, model headshots and editorial fashion spreads for magazines.
Examples of his work:


John Hong:

John Hong is a Los Angeles based photographer and director that specialises in fashion/fashion advertisement.
Examples of his work:


Alona Fedorenko:

Alona Fedorenko is a wedding, portrait and fashion photographer based in Los Angeles, and is the owner of Anokiart Photography.
Examples of her work:


Main Shoot
Set up:


Contact Sheet:


Best Images:


Final Piece:

Extra Edited Images:


Development Through Photoshop:
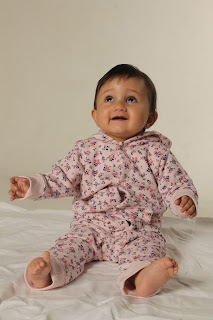
Baby Fashion Photoshoot:
Baby Photographers:
Anne Geddes:
Heather Mosher:
Lisa Holloway:
Baby Fashion Mood Board

Set up:


Contact Sheet:


Best Images:


Failed Images:


Edited Images:


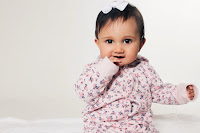


To edit my images for this shoot, I decided to do something slightly different so I used the Adobe Photoshop Express app (shown above) on my iPad, which is free on the Apple app store. As I don't have Photoshop on my laptop I thought this was the best way to edit my images, and I also wanted to show that you don't need expensive or high-tec software to make your images look great. The app doesn't have as many tools as Photoshop, but it's simple to use and makes your images look great, and it's also a brilliant app for students/photographers on a budget. I've never used this app before this shoot, but now I've found out how effective it makes my images I will definitely be using it a lot more for my work. As you can see the images look so much better after they've been edited, they are all much brighter and the backdrop is much whiter which is important in studio shoots. I made exactly the same changes for each of my images as I wanted them all the same, so they look more like a series of photos instead of all different images. These changes were:
Sharpen + 20
To make my images much sharper and more detailed, especially when you zoom into the image.
Exposure + 22
To make the images much brighter without making Leila too overexposed, and to also make the white backdrop look bright white instead of yellow.
Contrast + 20
To deepen the colours in the images which were made quite bland when making the exposure higher.
Highlights + 20
To make the light areas in the images really white/bright.
Shadows - 20
To make the darker areas in the images much darker, as making the exposure higher takes away the darkness in these areas.
Temperature - 10
To give my images more of a blue tone instead of yellow, as I prefer my images this way.
Vibrance + 10
To make the colours in my images bolder and brighter.
I also added a subtle filter to each of my images which makes them slightly brighter and also gives them a pink tint.


Development Through Photoshop:
Cake Smash Shoot:
Contact Sheet:


Best Images:


Edits:
Development Through Photoshop:
Contact Sheet:


Best Images:


Edits:
Development Through Photoshop:
Product Photography

Product Photographers:
Michael Jones:
Timothy Hogan:
Peter Belanger:
Mood Board

Product Photoshoot:
Studio lighting set up/ my home made studio:

I decided to only use one light for my product advertisement, as beforehand I experimented some shots with 2 lights but found it much too bright. To solve this, I used one light with a soft box and a reflector on the other side to brighten the subject up slightly. The other reason I decided to use one light, is because I wanted my images to have lots of shadows/tones.

I decided not to use my large backdrops for this shoot, as I thought that it was a waste of room because I was only shooting small objects. Instead, I taped some wrapping paper onto my wall back to front rolling down onto my chest of drawers, to create a plain white backdrop that I can place objects onto. I thought this was much easier and meant that I had more space to move around and use.

Contact Sheet:


Best Images:


Failed Images:


Edited Images:


Development Through Photoshop:

For this edit, I started with a clear and bright image. Using the polygonal lasso tool I selected the subjects one by one, then copied and pasted each of them so they each have their own layer.


For this edit, I started with a clear and bright image. Using the polygonal lasso tool I selected the subjects one by one, then copied and pasted each of them so they each have their own layer.

The image above is what the layers panel should look like when you've finished this part of the edit.


Fragrance Photoshoot:
Fragrance Photography Mood Board:

Contact Sheet:


Best Images:


Failed Images:


Edited Images:


Development Through Photoshop:


Select the perfume bottle with quick selection tool.

Go to select > inverse to select just the background.

Go to image > adjustments > hue/saturation

adjust the settings

then go to image > adjustments > brightness/contrast then adjust settings

now the background is done go to select > inverse to select the perfume bottle.
Then go to select > refine edge, bring the smooth, feather and contrast sliders to the right then click ok

image > adjustments > brightness/contrast adjust then ok

final outcome
White Balance:


Tungsten


Evaluation:

Daylight

Tungsten

White Fluerescent

Auto

Shade

Daylight

Daylight

Cloudy

White Fleurescent


Shade

Cloudy

Tungsten

Daylight

Cloudy

White Fleurescent


Auto

Tungsten

White Fleurescent
Evaluation: