Unit 33 Lens Based Image Making
Photo Restoration

For this task we had to restore old photos we were given using Photoshop, this picture is the first photo we were given. I am going to show you how I did this.

First of all, I unlocked the background layer (by double clicking the padlock in the layers bar) so I could make the actual photo straight. Make sure "show transform tools" is showing otherwise you won't be able to rotate your picture.

Next, I used the Rectangular Marquee Tool to select the photo, then went to Image > Crop. This was to get rid of the white border.

Working on a new layer (so I can easily delete any mistakes) I used the Healing Brush Tool to get rid of all of the scratches/creases in the photo.

As you can see, the photo looks so much better now all the scratches and creases are gone.

Working on a new layer again, I went to Image > Adjustments > Levels. This is what the levels bar looked like before I adjusted them.

I moved the black slider to the right and the white slider to the left to darken the shadows and lighten the highlights, I also moved the midpoint slightly to the left to brighten the picture. As you can see this looks much better.
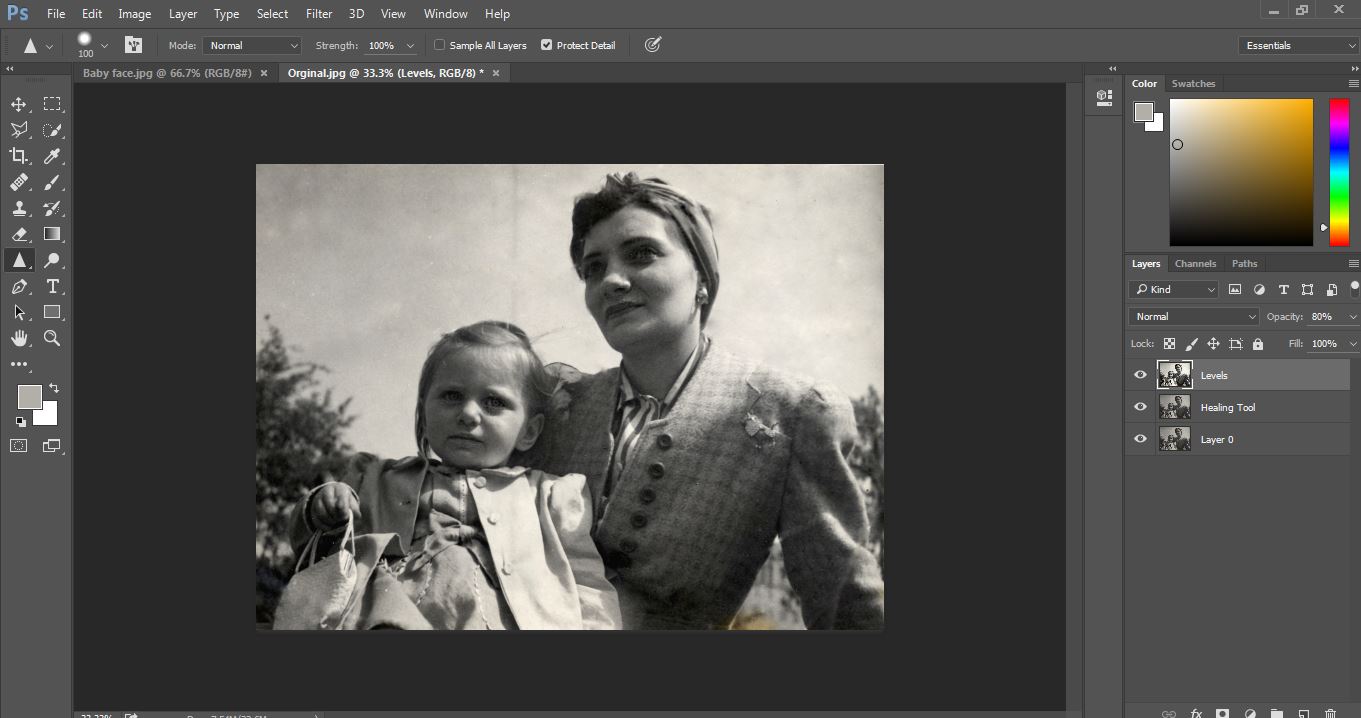
Finally, I reduced the levels layer opacity to 80 to make the effect softer, then used the sharpen tool to sharpen the subjects mouths and eyes.

This is the final outcome, as you can see the picture no longer looks old and battered and also is much brighter and clearer. I'm very surprised at how simple this task was to do as I thought it would've been really difficult. Although this edit isn't bad for my first try, I do think I could've done a better job.
Original Restored


I found this image much more difficult to restore than the first image, as this is a lot more damaged and creased. I did exactly the same techniques as I did with the first, except you can see this photo restoration didn't turn out half as well as the first.
Photo Colourisation


Image Trace


Repeating Pattern


Photograms
What is a photogram?
A photogram is a photographic picture made without a camera. You place a number of any type of objects onto photosensitive paper then expose it to light to create the patterns. Parts of the paper which have been covered with objects and have received no light appear white, if the objects are transparent or thin they appear grey, and the parts of the paper that are exposed to light appear black.
Who invented the photogram?
The photogram was invented by Joseph Nicephere Niepce in France in 1824. He coated a sheet of pewter with Bitumen of Judea, a type of asphalt. He exposed through a drawing and washed off the soft unexposed asphalt came out with a photogram copy of the drawing.
Making Photograms


 *photogram 1*
For this photogram I tested out different timings for the light exposure, using a piece of paper I covered the photosensitive paper and moved it slightly each time to test different timings. I first tested 10 seconds on one strip, then 8 seconds, 6 seconds, 4 seconds and then finally 2 seconds. I found that 10 seconds came out really dark and 2 seconds came out really light which usually isn't good, but with transparent materials such as lace this looks really effective as shown above.
*photogram 2*
I decided to use the 10 second exposure for my second photogram as I liked how my rosary beads turned out, I also liked the different shades and shadows in the daisies but was disappointed that the lace and confetti stars weren't very bold.
Pinhole Cameras
How do pinhole cameras work?
When you load light sensitive paper into the can you will need to place the shiny side facing the pinhole because this is the light sensitive side. The image that you get on your paper is a negative image, this is when the colours on the picture are opposite colours. Any dark areas come out light and any light areas come out dark. The image will come out upside down on your paper, this is because light travels in straight lines. I have explained this with a diagram below.

Making a DIY Pinhole Camera
Below I have made a tutorial on how to make a DIY pinhole camera from a can, this is the actual pinhole camera I made at home so I photographed how I did this and also annotated what I did.


*pinhole photo 1*
For this photogram I balanced my pinhole camera on a wall, then sat on a wall opposite the can to capture myself (with the help of a friend opening the "door" for me). I like that my figure stands out quite well but I think my pinhole image is sightly overexposed.
*pinhole photo 2*
Here I captured a friend standing against a fence with her arms out. I'm happy with the exposure of this pinhole image and also how dark the sky came out. If I could redo this photogram I would balance the pinhole camera on something steady to reduce blur.
Medium Format Camera Photography
Blog Evaluation


Portfolio


What is a photogram?
A photogram is a photographic picture made without a camera. You place a number of any type of objects onto photosensitive paper then expose it to light to create the patterns. Parts of the paper which have been covered with objects and have received no light appear white, if the objects are transparent or thin they appear grey, and the parts of the paper that are exposed to light appear black.
Who invented the photogram?
The photogram was invented by Joseph Nicephere Niepce in France in 1824. He coated a sheet of pewter with Bitumen of Judea, a type of asphalt. He exposed through a drawing and washed off the soft unexposed asphalt came out with a photogram copy of the drawing.
Making Photograms


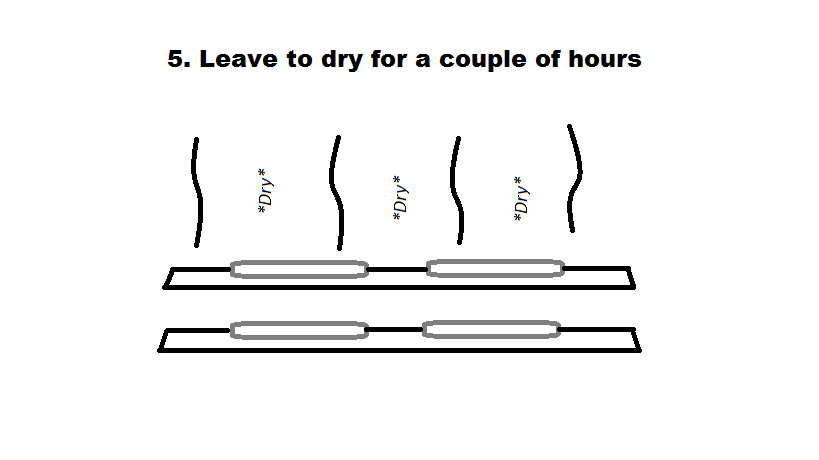
For this photogram I tested out different timings for the light exposure, using a piece of paper I covered the photosensitive paper and moved it slightly each time to test different timings. I first tested 10 seconds on one strip, then 8 seconds, 6 seconds, 4 seconds and then finally 2 seconds. I found that 10 seconds came out really dark and 2 seconds came out really light which usually isn't good, but with transparent materials such as lace this looks really effective as shown above.
*photogram 2*
I decided to use the 10 second exposure for my second photogram as I liked how my rosary beads turned out, I also liked the different shades and shadows in the daisies but was disappointed that the lace and confetti stars weren't very bold.
Pinhole Cameras
How do pinhole cameras work?
When you load light sensitive paper into the can you will need to place the shiny side facing the pinhole because this is the light sensitive side. The image that you get on your paper is a negative image, this is when the colours on the picture are opposite colours. Any dark areas come out light and any light areas come out dark. The image will come out upside down on your paper, this is because light travels in straight lines. I have explained this with a diagram below.

Making a DIY Pinhole Camera
Below I have made a tutorial on how to make a DIY pinhole camera from a can, this is the actual pinhole camera I made at home so I photographed how I did this and also annotated what I did.


*pinhole photo 1*
For this photogram I balanced my pinhole camera on a wall, then sat on a wall opposite the can to capture myself (with the help of a friend opening the "door" for me). I like that my figure stands out quite well but I think my pinhole image is sightly overexposed.
*pinhole photo 2*
Here I captured a friend standing against a fence with her arms out. I'm happy with the exposure of this pinhole image and also how dark the sky came out. If I could redo this photogram I would balance the pinhole camera on something steady to reduce blur.
Medium Format Camera Photography
Blog Evaluation

Unit 30 Location Photography
3 Favourite Pieces of Work:


Why are they the best?
What could you have done better?
Portfolio


End of Year Show
Below are the photos showing my display for the City of Bristol College Art & Photography end of year exhibition. I was really happy with the way my display looked even if I did go completely against the advice of my tutors! Most students displayed one unit on their display boards, but as I chose location photography as the theme for my final major project, I decided to display both my final major project and my location photography unit together. I also used a lot more images than other students as you can see. As the other students boards were white they placed 4-8 mounted prints on their display, but as my board is black I thought a black frame would look silly on the black board, so decided to take my images out of their frames and just place prints on my display.


Below are the photos showing my display for the City of Bristol College Art & Photography end of year exhibition. I was really happy with the way my display looked even if I did go completely against the advice of my tutors! Most students displayed one unit on their display boards, but as I chose location photography as the theme for my final major project, I decided to display both my final major project and my location photography unit together. I also used a lot more images than other students as you can see. As the other students boards were white they placed 4-8 mounted prints on their display, but as my board is black I thought a black frame would look silly on the black board, so decided to take my images out of their frames and just place prints on my display.
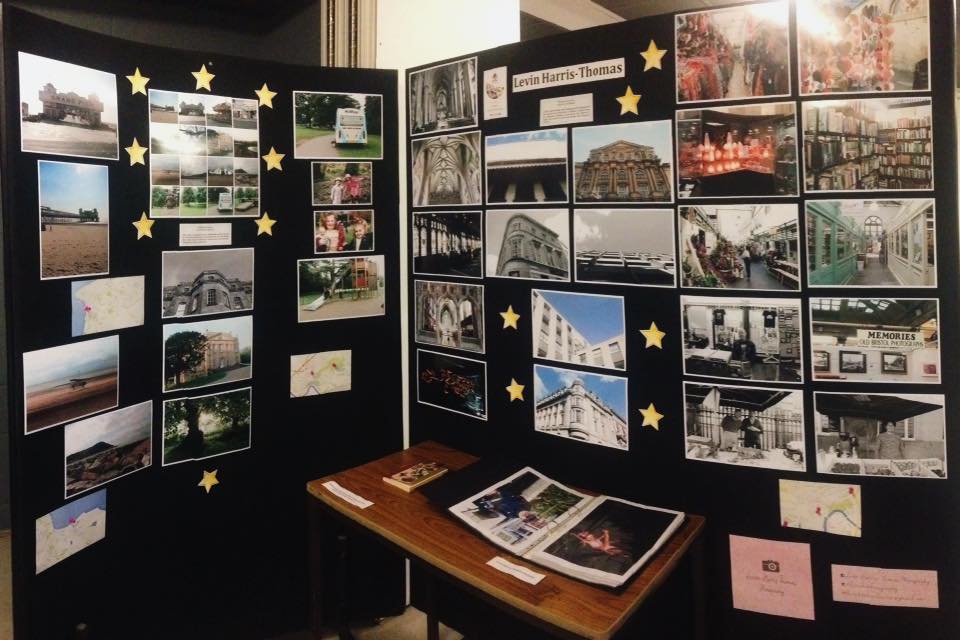
My entire display

Location photography

More location photography

My final major project board

That's me!

I decided to display my photography logo and contact details as a bit of self promotion, because why not?!

My portfolio was laid out on the table in front of my display in a ringbinder, on the Monday 6pm private viewing I also had my iPad set up on the table with a slide show of all my images, both personal and college.

I decided that placing a book on my desk for people to leave thoughts, views, opinions, messages or criticism would be a great opportunity for me to see what I've done well and what I can improve on.


I only got 7 messages in this book altogether but was really happy with the really nice messages people left me.